
“Why is my computer so slow after the Windows 10 Creators Update?”
“Could you please tell me how to speed up my computer? I deeply regret to update to the Windows 10 v1703. The Creators Update slows down my Dell laptop!”
“The slow PC stops me from my office work because of the Creators Update. Anybody knows how to make my computer faster?”
“I can’t stand such slow computer!”
Many Windows users should have enjoyed the new features after the Windows 10 Creators Update or the Windows 10 Fall Creators Update, but to their surprise, they suffer a slow computer and can’t even use the machine as usual. The Microsoft Edge browser is not working because of the slow Internet; the default apps notifications keep popping up and cause the PC slow issue; the high CPU usage or 100% disk usage makes the mouse not even moving. Various factors result in the slow computer problem that makes the users complain from time to time.

Are there any solutions to speed up the slow computer running Windows 10 Creators Update/Windows 10 Fall Creators Update? The answer is YES! Today, let’s have a close look at the top 10 methods below to optimize your lagging desktop or laptop.
How to Speed up Your Slow Computer Running Windows 10 Creators Update/Fall Creators Update
You can try the following 10 ways one by one to fix the slow or sluggish computer:
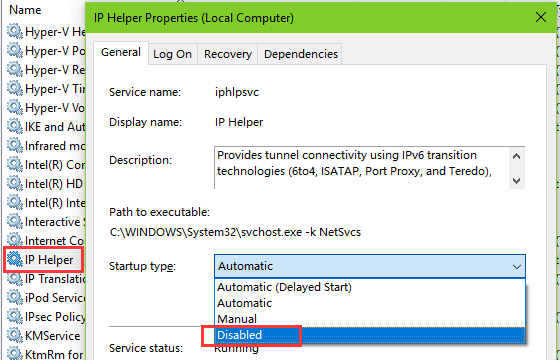
Way 1. Disable IPv6/ IP Helper Service on Windows 10 Creator Update and Speed up the Slow Computer
It’s recommended to disable the IPv6 or the IP Helper service after you install the Windows 10 Creators Update/Windows 10 Fall Creators Update for the service is seldom used and it often occupies part of the system resources, which will slow down the computer.
Step 1. Use Windows shortcut keys Win + R to launch the Run.
Step 2. Type into services.msc.
Step 3. Hit the Enter.
Step 4. Scroll down for the IP Helper service and double-click it.
Step 5. Select the Disable from the drop-down menu of Startup type.
Step 6. Click OK.
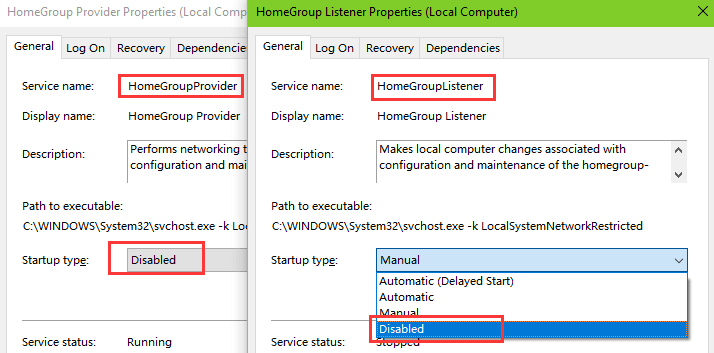
Way 2. Disable Home Group Service to Fix the Slow Computer Problem
Windows 10 defaults the HomeGroup services to be available but this will cause the lag or sluggishness of the computer OS such as high CPU usage problem, 100% disk usage issue, low virtual memory error, etc. For instance, if you have only one desktop or laptop at home, or if you rarely share files between two PCs, it is better to disable the HomeGroup service on Windows 10 Creators Update/Fall Creators Update so that you can speed up the slow computer.
Step 1. Open the Windows Services.
Step 2. Double-click the HomeGroup Listener service and the HomeGroup Provider service.
Step 3. Select the Disable from the drop-down menu of Startup type.
Step 4. Click OK.
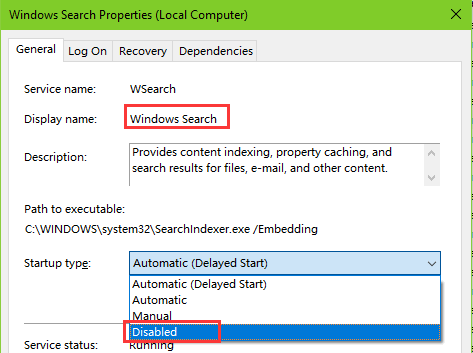
Way 3. Disable Windows Search Service to Speed up the Windows 10 Computer
If you get stuck on black screen after the Windows 10 Creators Update, the hard disk may run under high load and the OS may create indexes for searching in the background. The high-load read/write can affect the service life of the hard disk and result in a slow PC, so if you seldom use the Windows search service on your Windows 10 Creators Update/Fall Creators Update computer, you can disable it to speed up the PC.
Step 1. Open the Windows Services.
Step 2. Double-click the Windows Search service.
Step 3. Select the Disable from the drop-down menu of Startup type.
Step 4. Click OK.
Way 4. Modify the Default Power Plan to Speed up Your Slow PC
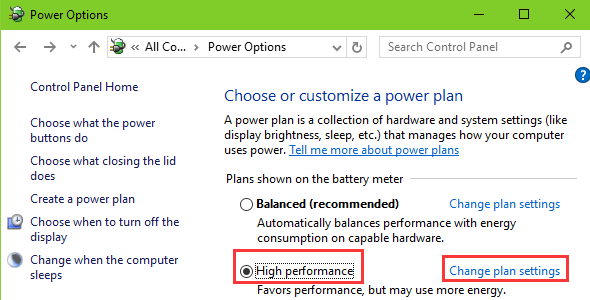
There are three power plans in Windows 10: Balanced, Power saver, and High performance. When the computer turns to the high-load state from idle state, the “High performance” plan responses much faster than the “Power saver”. So if you’re using a desktop or a laptop with the power charger, you can set the power plan to the “High performance” to experience the speedy Windows 10 Creator Update/Fall Creators Update.
Step 1. Launch the Run.
Step 2. Type into powercfg.cpl.
Step 3. Click the OK.
Step 4. Choose the High performance plan.
Step 5. Click the Change plan settings beside the High performance.
Step 6. Click the Change advanced power settings.
Step 7. Expand the Wireless Adapter Settings.
Step 8. Set the Power Saving Mode as Maximum Performance.
Step 9. Expand the PCI Express.
Step 10. Set the Link State Power Management as Off.
Step 11. Expand the Processor Power Management.
Step 12. Set the Maximum processor frequency as the highest frequency of the currently running CPU.
Step 13. Click Apply.
Step 14. Click OK.
Step 15. Click Save changes.

Way 5. Enable Fast Startup to Fix Slow Boot after Windows 10 Creators Update/Windows 10 Fall Creators Update
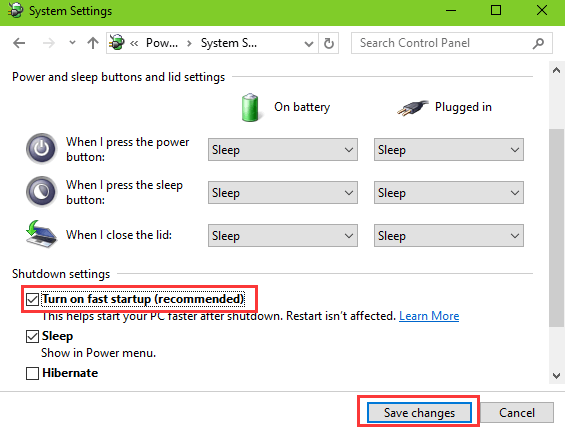
Also, you can enable the fast startup in the Power Options to speed up the slow desktop or laptop on Windows 10 Creators Update.
Step 1. Launch the Run.
Step 2. Type into powercfg.cpl.
Step 3. Click the OK.
Step 4. Click the Choose what power buttons do on the left side.
Step 5. Click the Change settings that are currently unavailable.
Step 6. Check the Turn on fast startup.
Step 7. Click the Save changes.
Way 6. Disable Windows Defender to Fix the Slow Computer Problem
If you end the Windows Defender, you will find that your slow computer will run quickly without the lag. That’s because the Windows Defender will cause the high-CPU-utilization when it opens the folder storing many .exe files. You can install some safe anti-virus programs to take place of the Windows 10 Creators Update/Fall Creators Update built-in security software. Here’s How to Disable Windows Defender in Windows 10.
Way 7. Make Changes in User Accounts Settings on Windows 10 Creator Update
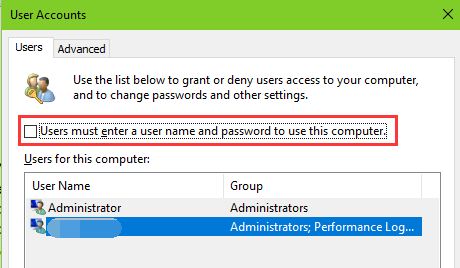
If you’re using your Windows 10 computer at home or in a private place, then you can log in the Windows without the passwords. Thus the slow PC problems can be resolved.
Step 1. Launch the Run with Windows shortcut keys Win + X.
Step 2. Type into netplwiz.
Step 3. Click OK.
Step 4. Highlight the current user account.
Step 5. Uncheck the User must enter a user name and password to use this computer above.
Step 6. Type the password.
Step 7. Click OK.
Way 8. Create a Non-Administrator Account on Windows 10 Creators Update
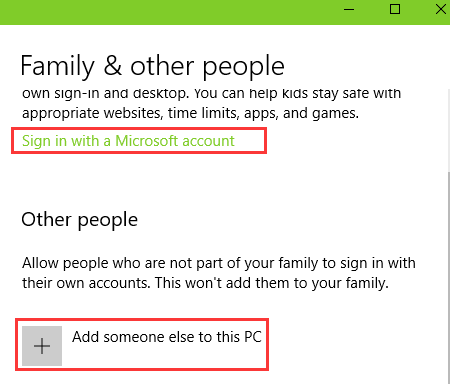
If you’re using the Administrator account on your Windows 10 Creators Update/Fall Creators Update desktop or laptop, it’s possible for the virus, malware or other unsafe programs to get access to the system and to slow down the PC and to cause many other problems like keyboard not working, error 0x8000ffff, boot loop, etc. So it is recommended to create a non-administrator account.
Step 1. Use Windows shortcut keys Win + I to launch the Settings.
Step 2. Go to the Accounts menu.
Step 3. Choose the Family & other people tab.
Step 4. Click the Sign in with a Microsoft account or Add someone else to this PC
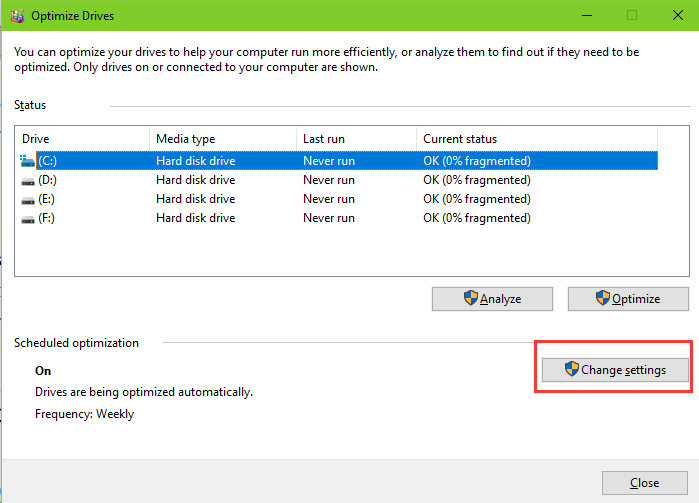
Way 9. Optimize the Hard Disk Drive and Speed up the Slow Computer
You also need to optimize the hard disk drive regularly to speed up the slow Windows 10 Creators Update/Fall Creators Update PC. Windows 10 can automatically select the best ways to optimize the computer according to the types of the hard disk drives. This is how to perform the settings:
Step 1. Go to This PC.
Step 2. Right-click a local disk for the Properties.
Step 3. Choose the Tools tab.
Step 4. Click the Optimize button.
Step 5. Under the Schedule optimization, click the Change settings. (Note: If you can’t find it, you can click the Turn on button.)
Step 6. Check the Run on a schedule.
Step 7. Click OK.
Reference: https://www.drivethelife.com/windows-10/speed-up-slow-pc-windows-10-creators-update.html